Sunglasses
Pretty Cool Glasses!
Sunday, 20 May 2012
Grace
Grace is something you can never get, but only be given. There's no way to earn it, or deserve it, or bring it about any more than you can deserve the taste of raspberries and cream or earn good looks, or ring about your own birth.
A crucial eccentricity of the Christian faith is the assertion that people are saved by grace. There's nothing YOU have to do. There's nothing you HAVE to do. There's nothing you have to DO.
There's only one catch. Like any other gift, the gift of grace can be yours only if you'll reach out and take it.
Maybe, being able to reach out and take it is a gift too.
-Frederick Buechner, 1973
-Sarah Elizabeth
Things to think about.....
Wednesday, 29 February 2012
A Correction
I was talking with my mother's friend the other day, when she suddenly brought up the topic of my blog, and my most recent post.
She said "So, can you show me that bruise you got on Sunday?". I, of course, had no idea what she was talking about.
"What bruise??????" I asked.
"You know, the one you got when you were so drunk you couldn't remember where you got it!".
"Ummmmm, I don't have a bruise with a story like that.". I was now totally lost.
"Yes you do, you said so on your blog!!". Now it was all coming clear, or at least clearer that before. My last post (read "Living In The World, But Not Of It").
"Ohhhhhhh!!! My last post! In that post, I described what I don't do, because that's not what I want to portray to the world, in who I am.".
"Well, you should have been clearer, I thought that's the kind of person you were! I thought I had read you totally wrong! I thought your family was very free!".
Thus I am here to let you know, that while my last post might have given you the impression that I get heavily drunk, often, and get bruises, I do not. In fact, my bruises and the occasional drink are never linked.
I apologize for any confusion this might have caused you, or any misleading ideas! I had the biggest laugh over it, but really, it isn't that funny. I'll try to keep a straight face.
-Sarah
It's not working.
Sunday, 26 February 2012
Living in the World, But Not of It
A friend recently asked me the question: "For you, what does living in the world, but not of it, look like?". I have always been ready with an answer to her many questions, but this one stumped me.
I automatically knew that I would not be able to answer this question fast. I also could not answer this question directly.
For me, I don't know what living in the world but not of it looks like, because my view of my life differs when I look at myself when I am with different groups of friends.
When I am with my church friends, I feel very sheltered and unknowledgable of the world.
When I am with my home-schooled friends (of which I am one), I feel very worldly and knowledgeable.
Who am I?
When I am with my non-Christian friends at the barn or at work, I don't tell about how I woke up on Monday with a bruise the size of a softball on my hip and how I don't remember how I got it, because I was so drunk. I also don't swear a lot, gossip, or lie about other people.
Being different is what I strive to be. I don't want to lead an attractive life, for people to be attracted towards, I just want to lead a life that people look towards for guidance.
Leading a life like that means being transparent. Being transparent means not wondering what people want and trying to conform to their idea. It means doing what I know is right, without trying to figure out what other people think or want.
The hardest part of being different is trying to be the same person wherever you are. It means a consistency in truth.
That is what my life looks like as I try to live in the world, but not of it. I have no direct, complete answer for my friend's question, all I have is evidence of how I live my life. I think living my life to set an example to others is the most direct and complete way of answering the question: What does living in the world but not of it, look like?
-Sarah
Friday, 24 February 2012
Carling Fingerless Mittens
Carling Fingerless Mittens
An original design by Sarah Murley of Maple Leaf Rag(s)
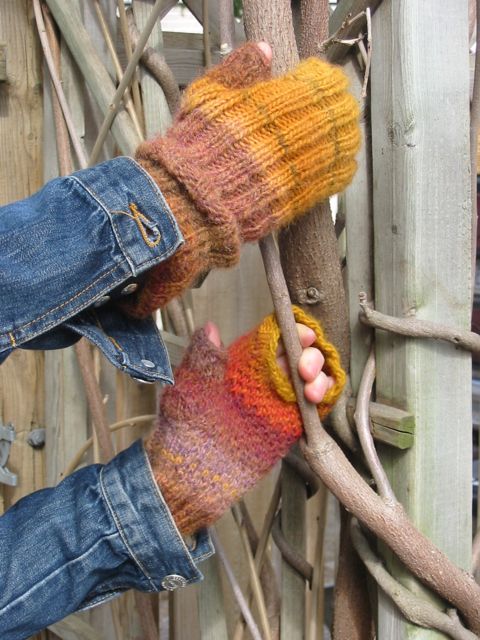
These fingerless mittens are knit top-down, from one ball of yarn. The Eye of Partridge stitches on the palm gives a nice, cushy grip, and the way the digit cover stretches farther than the palm gives your fingers more mobility, for things like holding a cup of hot chocolate, or texting!
I recommend knitting these fingerless mittens at the same time from both ends of the yarn, either on the same needle: like two-at-a-time-socks, or on separate needles, but keeping track of how far you are on each, as it isn't always nice to have a matching elbow warmer and palm warmer.
As said before, this pattern can be worked with the two-at-a-time method. If this is something you know how to do, go ahead and cast on two-at-a-time. If this is not something in your repertoire, don't worry, follow the pattern as-is.
Before You Start Your Carling Fingerless Mittens:
Measurements:
Small: approx. 15cm circumference
Medium: approx. 18cm circumference
Large: approx. 24cm circumference
Materials:
Yarn- 1 ball of “Amazing” by Lion Brand Yarn, shown in “Mesa” or any 147yds of Aran weight yarn
Needles- Set of 4 dpn in sizes 4mm (CAD 8- US 6) and 3.25mm (CAD 10- US 3)
2 stitch markers, can be made from the scrap yarn
A tapestry needle to weave in ends.
Gauge- 16sts and 24rows = 4inches (10cm) in Stockinette stitch
Knitting lingo:
CO- Cast on
Sts- Stitches
St-Stitch
K- Knit
P- Purl
S- Slip
M1- Make 1 (knit into front and back of same stitch)
Notes before you begin:
-The stars (*) show that you are to repeat in between them for the amount of times given.
-When casting on for the thumb hole, make it nice and loose.
Larger and Smaller Sizes:
The mittens shown in the picture fit a 19cm in circumference around the palm just above the thumb (size medium). As mittens can be worked in 3 sizes, details for each size are shown in 3 different colours for ease in knitting: (small, medium and large).
*Ex. k20 (30, 40)
Caring for your beautiful mittens:
Most yarn, specifically fluffy yarn, or natural fibres, will pill, which means that you will get tiny balls of felted fiber stuck to your finished item. This is caused by the item continuously brushing up against something, like your pocket, or just by age. You can prevent this by giving them a rest once in a while, and a wash.
Wash them gently, by hand, in warm water, and a bit of clothes detergent, or Eucalan (a wool wash). Lay them flat to dry, don't put them in the dryer.
Right mitten:
CO 28 (34, 40), with the 4mm needles, join into a circle, making sure the stitches aren't twisted. Place the marker at the beginning of the round, and slip the markers whenever you come to one.
Rnd 1: * k2, p2 *, repeat from * to * 3x (4x, 5x), k2, place 2nd marker, * K1, S1 as if to knit *, repeat from * to * 7x (8x, 9x)
Rnd 2: * k2, p2 * 3x (4x, 5x), k2, slip marker, k14 (k16, k18)
Rnd 3: * k2, p2 * 3x (4x, 5x), k2, *s1, k1 * 7x (8x, 9x)
Rnd 4: * k2, p2 * 3x (4x, 5x), k2, * k14 (k16, k18)
Repeat Rnds 1- 4 5x, then knit Rnd 1 once more.
Begin Increases:
Rnd 1: * k2, p2 * 3x (4x, 5x), k2, k12 (k14, k16), m1 into the next 2sts. You now have 16sts – 18sts - 20sts between last 2 markers.
Rnd 2: * k2, p2 * 3x (4x, 5x), k2, * s1, k1 * 8x (9x, 10x)
Rnd 3: * k2, p2 * 3x (4x, 5x), k2, k12 (k14, k16), * m1, k1 * 2x. You now have 18sts (20sts, 22sts) between the last 2 markers
Rnd 4: * k2, p2 * 3x (4x, 5x), k2, * k1, s1 * 9x (10x, 11x)
Rnd 5: * k2, p2 * 3x (4x, 5x), k2, k15 (k17, k19), place a st marker CO 10sts (12sts, 14sts), continue on past the newly CO sts and k3 before the marker. Divide the new stitches onto each adjoining needle, this makes it easier to decrease later.
Rnd 6: * k2, p2 * 3x (4x, 5x), k2, *s1, k1 * 10x (12x, 12x), * k2, p2 * 2x (2x, 3x)
Rnd 7: * k2, p2 * 3x (4x, 5x), k2, k20 (k24, k24), * k2, p2 * 2x (2x, 3x)
Rnd 8: * k2, p2 * 3x (4x, 5x), k2, * k1, s1 * 10x (12x, 12x), *k2, p2 * 2x (2x, 3x)
Rnd 9: * k2, p2 * 3x (4x, 5x), k2, k20 (k24, k24), *k2, p2 * 2x (2x, 3x)
Rnd 10: Knit as Row 6
Rnd 11: Knit as Row 7
Rnd 12: Knit as Row 8
Begin Decreases:
Rnd 13: * k2, p2 * 3x (4x, 5x), k2, k14 (k18, k18), k2tog, k6, {small- p2, k2tog, p2} – {medium p2, k2tog, p2}- {large p2, k2, p2, k2tog, p2}
Rnd 14: * k2, p2 * 3x (4x, 5x), k2, * s1, k1 * 7x (9x, 9x), k2tog, s1, k1, s1, {small- k2} - {medium- k2 - {large- k2, p2, k2), p1, k2tog, p2
Rnd 15: * k2, p2 * 3x (4x, 5x), k2, k14 (k18 - k18), k2tog, k4, {large- p2, k2}, k2tog, p2
Rnd 16: * k2, p2 * 3x (4x, 5x), k2, * k1, s1 * 7x (9x - 9x), k2tog, k1, s1, {large- k1, p2, k1}, k2tog, p2
Rnd 17: * k2, p2 * 3x (4x, 5x), k2, k14 (k18 - k18), k2tog 2x, p2, {large- k2, p2}
Rnd 18: * k2, p2 * 3x (4x, 5x), k2, *s1, k1 * 7x (9x - 9x), k2, p2, {large- k2, p2}
Rnd 19: * k2, p2 * 3x (4x, 5x), k2, k14 (k18 - k18), k2, p2, {large- k2, p2}
Rnd 20: * k2, p2 * 3x (4x, 5x), k2, * k1, s1 * 7x (9x - 9x), k2, p2, {large- k2, p2}
Rnd 21, 23, 25, 27, 29, 31: Knit as Row 19
Rnd 22, 26, 30: Work as Row 18
Rnd 24 and 28: Work as Row 20
Note:
If you want to lengthen the eye-of-partridge palm-grip so it is longer, now is your time to do it. Knit the R19 – R18 – R19 – R20 pattern starting with a R20, you may end on any row you choose.
Cuff:
Change to 3.25mm needles. Cuff is the same for both mittens, per size.
Row 1: * k2, p2 * 8x (10x - 11x)
Row 2: As Row 1
Repeat these rounds until you have the desired length for the cuff. Remember that you still need yarn for the thumbs, and the other cuff, if you aren't doing the mittens at the same time.
Bind off:
Bind off loosely “in pattern”. This you will do by knitting the 1st two stitches as usual in the cuff pattern, jumping the 1st one over the 2nd and off the needle. Purl the next stitch, and jump the knit stitch over the purl stitch, off the needle. Continue like this, knitting/purling the next stitch, and jumping the one before it off the needle.
Right thumb:
Pick up 12sts (14sts - 16sts) evenly around thumb hole with the 4mm needles, following where the stitching falls. Place marker to indicate beginning of round.
Rnd 1: {small- k2, p2, k2, * s1, k1 * 3x}- {medium k2, p2, k2, * s1, k1 * 4x}– {large- * k2, p2 * 2x, * s1, k1 * 4x }
Rnd 2:{small- k2, p2, k2, k6}- {medium- k2, p2, k2, k8}- {large- * k2, p2 * 2x, k8}
Rnd 3:{small- k2, p2, k2, * k1, s1 * 3x}- {medium- k2, p2, k2, * k1, s1 * 4x} - {large- * *k2, p2 * 2x, *k1, s1 * 4x}
Rnd 4: As Row 2
Rnd 5: As Row 1
Rnd 6: As Row 2
Rnd 7: As Row 3
Rnd 8: As Row 2
Rnd 9: As Row 1
Rnd 10: As Row 2
Bind off in pattern, and weave in ends. Wear and enjoy!
Left Mitten:
Work exactly as the right mitten, ending just before the increases, with a * k1, s1 * row.
Start increases:
Rnd 1: * k2, p2 * 3x (4x, 5x), k2, m1 2x, k12 (k14 - k16). You know have 16sts (18sts - 20sts) between the markers.
Rnd 2: * k2, p2 * 3x (4x, 5x), k2, * s1, k1 * 8x (9x - 10x)
Rnd 3: * k2, p2 * 3x (4x, 5x), k2, * k1, m1 * 2x, k12 (k14 - k16). You now have 18sts (20sts – 22sts) before the markers.
Rnd 4: * k2, p2 * 3x (4x, 5x) k2, * k1, s1 * 9x (10x - 11x)
Rnd 5: * k2, p2 * 3x (4x, 5x), k2, k3, CO 10sts (12sts - 14sts), k15 (k17 - k19)
Rnd 6: * k2, p2 * 3x (4x, 5x), k2, * p2, k2 * 2x (2x - 3x), * s1, k1 * 10x (12x - 12x)
Rnd 7: * k2, p2 * 3x (4x, 5x), k2, * p2, k2 * 2x (2x - 3x), k20 (k24 - k24)
Rnd 8: * k2, p2 * 3x (4x, 5x), k2, * p2, k2 * 2x (2x - 3x), * k1, s1 * 10x (12x – 12x)
Rnd 9: * k2, p2 * 3x (4x, 5x), k2, * p2, k2 * 2x (2x - 3x), k20 (k24 - k24)
Rnd 10: Knit as Row 6
Rnd 11: Knit as Row 7
Rnd 12: Knit as Row 8
Begin Decreases:
Rnd 13: * k2, p2 * 3x (4x, 5x), k2, {small- p2, k2tog, p2} – {medium- p2, k2tog, p2}– {large- p2, k2tog, p2, k2, p2}, k6, k2tog, k14 (k18 - k18)
Rnd 14: * k2, p2 * 3x (4x, 5x), k2, p2, k2tog, p1, {small k2}, {medium- k2}– {large- k2, p2, k2} s1, k1, s1, k2tog, * s1, k1 * 7x (9x - 9x)
Rnd 15: * k2, p2 * 3x (4x, 5x), k2, p2, k2tog, k4, k2tog, k14 (k18 - k18)
Rnd 16: * k2, p2 * 3x (4x, 5x), k2, p2, k2tog, s1, k1, k2tog, * k1, s1 * 7x (9x - 9x)
Rnd 17: * k2, p2 * 3x (4x, 5x), k2, p2, k2tog 2x, k14 (k18 - k18)
Rnd 18: * k2, p2 * 3x (4x, 5x), k2, p2, k2, *s1, k1 * 7x (9x - 9x)
Rnd 19: * k2, p2 * 3x (4x, 5x), k2, p2, k2, k14 (k18 - k18)
Rnd 20: * k2, p2 * 3x (4x, 5x), k2, p2, k2, * k1, s1 * 7x (9x - 9x)
Rnd 21, 23, 25, 27, 29, 31: Knit as Row 19
Rnd 22, 26, 30: Work as Row 18
Rnd 24 and 28: Work as Row 20
Note:
If you want to lengthen the eye-of-partridge palm-grip so it is longer, now is your time to do it. Knit the R19 – R18 – R19 – R20 pattern starting with a R20, you may end on any row you choose.
Cuff:
Change to 3.25mm needles. Cuff is the same for both mittens, per size.
Rnd 1: * k2, p2 * 8x (10x - 11x)
Rnd 2: As Row 1
Repeat these rows until you have the desired length for the cuff, keeping in mind that you still need yarn for the thumbs, and the other cuff, if you aren't doing the mittens at the same time.
Bind off:
Bind off loosely “in pattern”. This you will do by knitting the 1st two stitches as usual in the cuff pattern, jumping the 1st one over the 2nd and off the needle. Purl the next stitch, and jump the knit stitch over the purl stitch, off the needle. Continue like this, knitting/purling the next stitch, and jumping the one before it off the needle.
Left thumb:
Pick up 12sts (14sts - 16sts) evenly around thumb hole with the 4mm needles, following where the stitching falls. Place marker to indicate beginning of round.
Rnd 1: {small- * s1, k1 * 3x, k2, p2, k2}- {medium- * s1, k1 * 4x, k2, p2, k2}- {large- * s1, k1 * 4x, * k2, p2 * 4x}
Rnd 2: {small-k6, k2, p2, k2} - {medium-k6, k2, p2, k2, p2} – {large- k8, * k2, p2 * 8x}
Rnd 3: {small-* k1, s1 * 3x, k2, p2, k2} - {medium-* k1, s1 * 4x, k2, p2, k2} - {large- * k1, s1 * 4x, * k2, p2 * 4x}
Rnd 4: As Row 2
Rnd 5: As Row 1
Rnd 6: As Row 2
Rnd 7: As Row 3
Rnd 8: As Row 2
Rnd 9: As Row 1
Rnd 10: As Row 2
Bind off in pattern, and weave in ends. Wear and enjoy!
Copyright 2012, Sarah Murley of Maple Leaf Rag(s), All Rights Reserved
For pattern support or questions, contact Sarah Murley @
Please do not redistribute, reproduce or sell the pattern or finished object.
Thursday, 23 February 2012
Funniest YouTube
This is one of the funniest YouTube videos I. Have. Ever. Seen.
Part of you feels really sorry for the kid, but the other half thanks the mother for posting the video!
-Sarah
Part of you feels really sorry for the kid, but the other half thanks the mother for posting the video!
-Sarah
Monday, 20 February 2012
My Current Boyfriend's Name is Leonard
I have a lovely cat. That no one likes.
He is a beautiful cat, sleek black fur, no other colour than black in his coat, with gorgeous green eyes, and the daintiest paws. With the sharpest claws. He's horrible!

Unfortunately, he loves to use his claws, on other people's things. Luckily, he has never sharpened his claws on anything of mine, and if he has, it wasn't important, because I don't remember.
My sister has quite the aversion to this cat, Leonard, because since he came into this house, he has discovered both, in this particular order, that she does not like him, and which scratching post is the best (the leg of her bed).
He is not all malice though, he loves my Mum and Dad, especially since their bed is is comfier than mine, and to mix things up, if it isn't the bed, it is the back of the TV.
As I said before, he loves to use his claws, which was great until we found a blueprint for a site from my Dad's new job in shreds on the floor. And I mean shreds. Needless to say, he lost a life.
I was totally fine with all this (as fine as one can be under the circumstances), and totally repentant. I know it sounds weird that a animal's owner should be repentant of their pet's sins, but in our family, that's how it works. It is sort of a team effort.
Next, it was my Mum's knitting magazine. Colorful confetti lay strewn on the floor, adding to the gaiety that Leonard felt was needed to spice things up a bit. I am beginning to think he loves the sounds (maybe not of ripping paper, but of screaming humans?)
After the knitting magazine, there was a lull, where my father insisted that all the cat's claws be cut, or made blunt.

Like that was going to help!
Just recently, I got music from the Richmond Hill Philharmonic Orchestra as audition music for my entrance. Lovely gothic pieces, infused with 12-note tied notes, and shifting up to 8th position. I practiced them diligently until Leonard shredded the 2nd page for fun. I mean, if he was going to give me all that pain, he at least could have had a purpose.
He is down to 4 lives by now. Or maybe it is less by now, it's kind of hard to keep track.
-Sarah
Catwoman
Sunday, 19 February 2012
MLSE Team Up Foundation Fund
Most of you may know this, others may not. On Monday afternoons, from 12.30pm - 6.45pm, I volunteer at CARD. CARD stands for "Community Association for Riding for the Disabled".
During my 6-1/4 hour block, I work with the riders, whose abilities range from mildly autistic, to having lost all control of their limbs in a car accident. I also walk the horses. When I walk the horses, my job is to control their speed, make sure they behave, and keep them calm. I also do a bit of work in the barn, turning the horses in and out of the paddocks, feeding them, and generally just hanging around.
This month, February, I was voted Volunteer of the Month. I have volunteered at CARD for 5 years. That is a long time to be working at one place. Sometimes the days feel really long, and other days they are surprisingly short.
Also this month, CARD has been participating in the MLSE Team Up Foundation Fund. The basic idea is that everyday, participants vote for their favorite charity to win the $50,000 grant. CARD's plan is to renovate their washroom facilities, to include a family washroom as well as to renovate their existing male and female washrooms.
My family has been voting for the past week, but even thought we are a big family, CARD needs all the help we can get! CARD is in 26th place right now. Tomorrow at 12pm, the voting closes. Before then, we need to get into the Top 20. After that, it is up to the judges to nominate the next winner(s).
You all can do me a huge favor and vote for CARD on the MLSE website here. It is very easy, and I know it would mean a lot to the staff at CARD. The Community Association for Riding for the Disabled (CARD) thumb nail and toggle is in the "View the Contestants" gallery, about the 2nd or 3rd row from the bottom.
I know it might feel awkward voting for something you had no idea about before today, but CARD would really benefit from your vote, and in a way, so would I and all the other volunteers.
Please let your friends know about this, and send the link to them. Please also let them know where the CARD toggle is, and that the voting ends at 12pm tomorrow, Monday, Feb. 20th.
For you who missed it, here is the link again:
http://www.mlseteamupfoundation.org/giving/team-up-foundation-fund/
I'm excited to see what tomorrow's tally shows! Thank you, all!
-Sarah
Subscribe to:
Posts (Atom)